The Game
Window
The Game Window is
used to place and modify objects in the scenario. It also allows
preview of these additions in the scenario. The Game Window
displays the scenario as it would appear in the game. The Game
Window runs most Halo 2
game subsystems, including sound and physics.
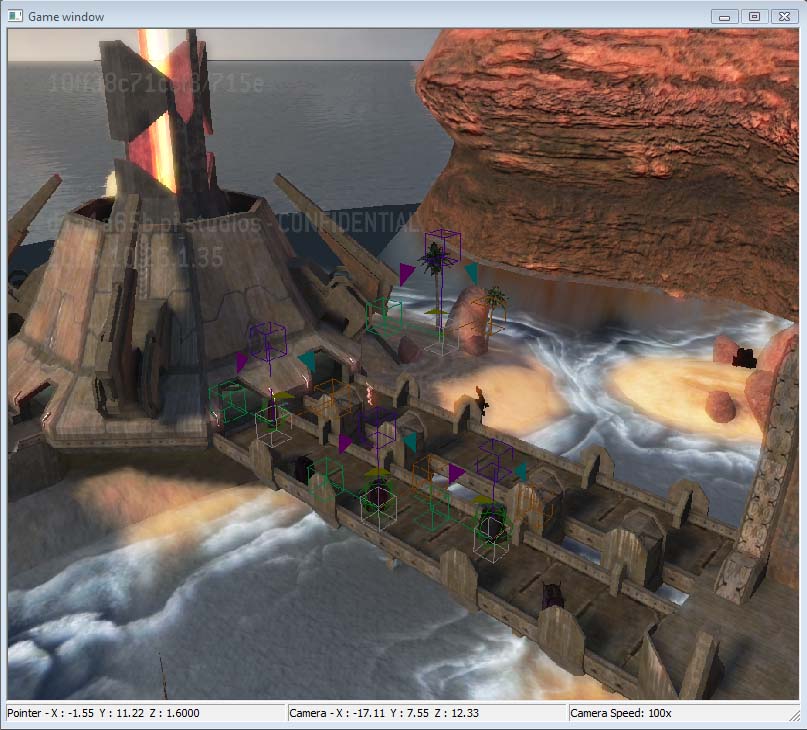
Halo 2 Sapien Game Window
Located along the bottom of the Game Window is
the status bar. It displays the coordinates of the cursor and
camera position.
Halo 2 Sapien Controls
The following table lists the default controls
and key commands used in Halo
2 Sapien, including shortcut keys for menu items. There are
many other contextual key commands and controls that are specific
to the type of object being edited or manipulated (such as
lights).
|
To
|
Do this
|
|
Select an object in the Game Window
|
Left-click it
|
|
Add objects to a selection
|
Hold down CTRL while left-clicking the
objects
|
|
Deselect an object or objects
|
Left-click the ground or a wall
|
|
Move a selected object
|
Click and drag the object or object
handle
|
|
Select multiple objects
|
Click and drag a selection box around
them
|
|
Jump to and zoom in the camera on a
location
|
Double-click the location in the Game Window
with the left mouse button
|
|
Jump to an object selected in the Hierarchy
pane
|
Double-click the object in the Hierarchy
pane or in the Game Window
|
|
Place a new instance of a selected
object
|
Right-click the location you want to place
it
|
|
Access camera controls
|
Click the wheel button anywhere in the game
window
|
|
Display the Debug menu
|
Hold down the wheel button while pressing
HOME
|
|
Change the camera movement speed
|
Rotate the mouse wheel, or tap SHIFT
|
|
Rotate the camera yaw in the Game Window
|
Hold down the wheel button and move the
mouse left and right
|
|
Rotate the camera pitch in the Game
Window
|
Hold down the wheel button and move the
mouse forward and backward
|
|
Move the camera forward in the Game
Window
|
Hold down the wheel button and press
W
|
|
Move the camera backward in the Game
Window
|
Hold down the wheel button and press
A
|
|
Pan the camera left in the Game Window
|
Hold down the wheel button and press
S
|
|
Pan the camera right in the Game Window
|
Hold down the wheel button and press
D
|
|
Move the camera up in the Game Window
|
Hold down the wheel button and press
R
|
|
Move the camera down in the Game Window
|
Hold down the wheel button and press
F
|
|
Delete the selected object
|
Press DELETE
|
|
Open the developer console in the Game
Window
|
Press TILDE (~)
|
|
Reset the map
|
Press ALT+R
|
|
Copy object transform values
|
Press CTRL+K
|
|
Paste object transform values
|
Press CTRL+L
|
|
Create a new scenario
|
Press CTRL+N
|
|
Open an existing scenario
|
Press CTRL+O
|
|
Save a scenario
|
Press CTRL+S
|
|
Reset object Z
|
Press CTRL+ALT+Z
|
|
Import comments
|
Press CTRL+SHIFT+L
|
The
Hierarchy Pane
The Hierarchy Pane is the main interface for
selecting and placing assets in the scenario. It’s similar to a
Windows Explorer window, with the asset type tree in the left pane.
Individual asset information is in the right pane. The folders are
not actual file folders that reside on the hard drive; they are
simply visual representations of the assets contained within the
scenario. There are three buttons within the Hierarchy Pane: Edit
Palettes, New Instance, and Delete.
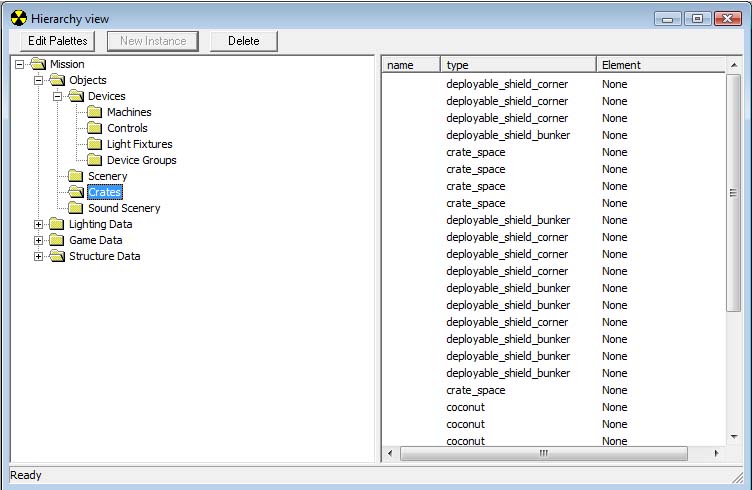
Hierarchy
View Window.
The Asset Type
Palette
Sapien and the Halo 2 engine load only the game
assets needed for each scenario. To load a specific asset, it must
be added to the asset set. Individual assets are added through the
Asset Type Palette. The Asset Type Palette is the list of assets
Sapien and Halo 2 load
into memory when a scenario is launched.
To add an asset type to a
scenario
1.
In the Hierarchy
Pane, click Edit
Palettes to display the Asset Type Palette.
2.
On the Object
Class menu, select the category of the object to add to the
scenario, and then click Add.
3.
Browse to the location of the correct tag, click
Add Tags, and then click
Done.
There is no visual representation of assets
within the scenario in the Hierarchy Pane. To verify your scenario
assets, refer back to the list in the Asset Type Palette.
Note:
Any asset added to the palette will always be loaded when the
scenario is launched, even if the scenario does not contain that
asset.
After the assets have been added to the Scenario
palette, they can be placed within the scenario. To place an
object, select the category in the Hierarchy pane—for example,
objects\scenery—and then right-click in the Game Window to place
the scenery object. After placement, use the Properties palette to
set the type (only asset types on the palette are available).
For more information on placing objects, see the
Placing Objects section.
The Properties
Palette
The Properties palette is used to edit a selected
object in the scenario. It displays the properties of the currently
selected object in the Hierarchy pane. See the individual help
sections for information on which properties may need to be
configured on each particular object.
Note:
Some boxes in the Properties palette are grayed out. These values
are informational and are not editable.
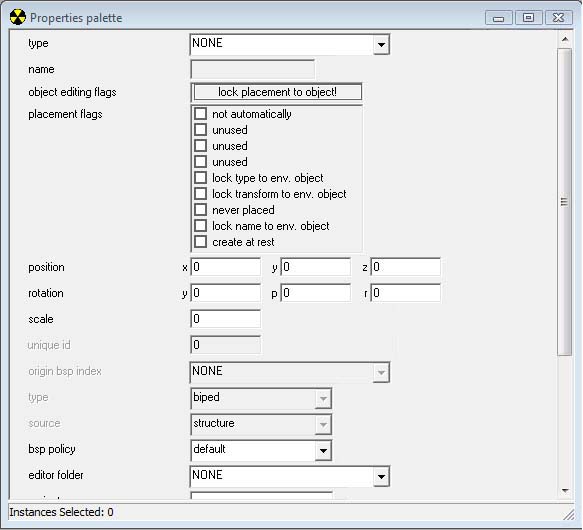
Properties
Palette Window.
Tool Window
The Tool Window displays the properties of the
Asset Manipulation Gizmo. These options change the way Gizmo
functions in selecting and positioning objects within the
scenario.
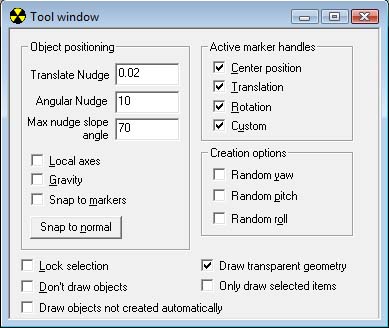
Tool
Window.
Local Axes: Sets the axes on the Gizmo to
match the rotation of the object. If this is not checked, the Gizmo
axes are positioned universally and do not move with changes to an
object's position.
Gravity: Disables the movement
handles on the Gizmo.
Active Marker Handles
Center Position: Toggles the free move
handle (center handle) of Gizmo.
Translation: Toggles the move
handles of Gizmo.
Rotation: Toggles the rotation handles of
Gizmo.
Custom: Only used when setting
trigger volumes. Allows resizing specific faces of trigger volumes
(otherwise the whole volume is scaled).
Creation Options
Random
Yaw: When checked, objects placed in the scenario (via
right-click) have a randomly generated yaw setting.
Random
Pitch: When checked, objects placed in the scenario (via
right-click) have a randomly generated pitch setting.
Random
Roll: When checked, objects placed in the scenario (via
right-click) have a randomly generated roll setting.
View Options
Lock Selection: Locks the currently
selected object so that another object cannot be selected.
Don't Draw
Objects: Disables drawing objects in Sapien.
Draw
Transparent Geometry: Renders transparent geometry, such as
glass, in the Game Window.
Only Draw
Selected Items: Renders the currently selected object in the
Game Window.

