The Asset Manipulation Gizmo consists of three triangles and four
cubes of different colors. The triangles control rotation, and the
cubes control movement. The Gizmo moves, rotates, resizes, and
reshapes various assets within a scenario.
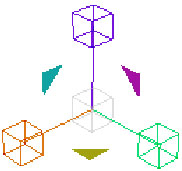
The Asset Manipulation Gizmo.
Rotate
You can rotate an asset with the Gizmo along three different axes.
Each rotation handle (a yellow, purple, or cyan triangle) controls
a different axis. To rotate an object, drag the desired rotation
handle until the asset reaches the desired rotation.
Note: For rotating a
light source, press and hold SHIFT to access the rotation
handles while rotating the light source.
·
<<yellow_triangle.jpg>> The yellow rotation
handle rotates the asset around its y axis (y = yaw).
·
<<magenta_triangle.jpg>> The purple rotation
handle rotates the asset along its r axis (r = roll).
·
<<turquoise_triangle.jpg>> The cyan rotation
handle rotates the asset along its p axis (p = pitch).
Move (or
Translation)
Assets can be moved along their x, y, and z axes or
in free move mode, which allows the asset to be placed along any
axis. Each movement handle (a green, orange, purple, or gray
square) controls a different axis. To move an object, drag the
desired movement handle into position.
·
<<green_cube.jpg>>
The green movement handle moves the asset along the y
axis.
·
<<orange_cube.jpg>>The orange movement
handle moves the asset along the x
axis.
·
<<purple_cube.jpg>>The purple movement
handle moves the asset along the z
axis.
·
<<grey_cube.jpg>>The gray movement handle
in the center of the Gizmo moves the asset along all axes at once.
This is also called free move mode.
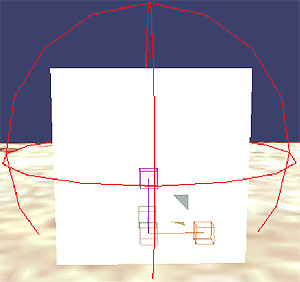
The scale function of the Gizmo with a
box scenery object selected.
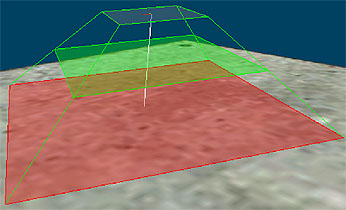
The scale function of the Gizmo on a
custom light object.
Scale (or
Resize)
To
activate the scale function of the Gizmo, press and hold ALT, and then drag the asset to
adjust its scale. The scale function on some assets, such as custom
lights, may have more than one scalable component. To activate the
additional scale function on a light, press and hold CTRL. This allows for the scaling
of the light plane itself. For an example of the scale function on
a custom light object, see Figure 3.
The Gizmo provides a visual reference for making precise changes to
assets by using the rotation, position, and scale attributes in the
Properties palette.

