Home
Halo 2 Editing Kit Tutorial Prev Page Prev Page
Welcome
Introduction
About the Halo 2 Map Editor and its Tools
What's new in Halo 2 Editing
Technology Overview
The Halo 2 for Windows Vista Engine
System Requirements
Definitions & Terms
Definitions & Terms
The Development Environment
Map Editor Contents
Map Editor Installation
Additional Tools and Utilities
Development Tools Overview
.ass Exporter
Halo 2 Tool
Halo 2 Guerilla
Halo 2 Sapien
Halo 2 Map Editor Launcher
Using .ass Exporter
Using .ass Exporter
Using Halo 2 Sapien
Asset Manipulation Gizmo
Halo 2 Sapien Game Window
Halo 2 Sapien Menus
Placing Objects
Placing Lights
Spawn Zones
Decorator Brush
World Ruler
Reset Object Z Height
Gravity Lifts
Teleporters
Sound Effects
Kill Trigger Volumes
Adding Extra Vehicles & Turrets
Game Types
Game Types
Assault
Capture The Flag
Juggernaut
King of the Hill
Oddball
Slayer
Territories
Using Halo 2 Guerilla
Sky Boxes
Sky Light Values
Starting Equipment
The Object Palette
Description Text
Location Text
Map Shots
Using Halo 2 Map Editor Launcher
Halo 2 Tool Level Creation
Halo 2 Level Creation
Import Structure
Generate Lightmaps
Import Descriptions
Creating Unicode Strings
Building Cache Files
Halo 2 Tool Texture Creation
Import Bitmaps
General Level Design Information
Design Style Guidelines
Technical Design Rules
Design Suggestions
Player Statistics and Metrics
Equipment List
Weapons
Vehicles
Multiplayer Level Design
Getting Started
Tutorial 1: Creating an Environment in 3ds Max
Tutorial 2: Exporting an Environment from 3ds Max
Tutorial 3: Importing an Environment to Tag Format
Tutorial 4: Placing Spawn Points Using Halo 2Sapien
Tutorial 5: Creating and Editing Environment Tags Using Halo 2 Guerilla
Tutorial 6: Synching Tags and Launching into the Game Environment
Portals
Additional Resources
Links
Console Command List
File Specifications
.ass File Specification
Credits
Appendix
Sample .ass file

Placing Lights

Previous Topic  Next Topic 

Light objects placed through Sapien are not intended to light the entire level and should be used in moderation.

To place a light

1.      In Sapien, open the scenario.

2.      In the Hierarchy Pane, click the Mission folder, the Lighting Data folder, the Lights folder, and then Edit Palettes.

3.      In the Object Class drop-down list, select the light object class if it is not already selected, and then click Add.

4.      Browse to the light tag you want to add (typically, in \tags\effects\generic_lights), click Add Tags, and then click Done.

5.      In the Hierarchy Pane, click the light, and then right-click in the Game Window to place the light.

6.      With the light selected, assign a type in the Properties Palette.

7.      Save the scenario.


A generic light object.


Resizing and Positioning a Light

Most aspects of a light object can be controlled using the Asset Manipulation Gizmo, including its size, shape, and brightness planes; however, to adjust these properties, the light must be set for custom geometry.

To set a light for custom geometry

ยท         In the Properties Palette, select Custom Geometry in the Flags section.


The custom geometry flag.

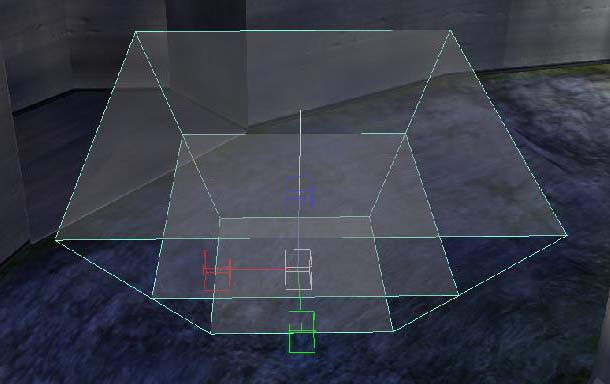
When a light is set for custom geometry, it has two Asset Manipulation Gizmos instead of one.


To

Press

Adjust the height of the light planes

ALT

Adjust the size of the light cone

CTRL

Access the rotation handles

SHIFT

Note that these properties can be adjusted in the Properties Palette with more precision.