|
Tutorial 4:
Placing Spawn points Using Halo 2 Sapien
|
 
|
This tutorial guides you through the process of
creating a simple environment for use in the Halo 2 game engine.
Note:
Halo 2 Sapien works
within the tags folder. If you've completed the previous three
tutorials, you'll want to browse to your working folder and then
look in tags\scenarios\multi\mylevel.
Now that you’ve created a map and gotten all of
the tags ready to load it, you need to place a spawn point in it so
that a player model spawns and you can run around in the map.
To place a spawn point
1.
Start Halo 2 Sapien.
2.
Click Open on the File menu, navigate to your
level’s folder, select the .scenario file, and then click Open.
Sapien is the tool that is
used to make all game-engine changes to your level. You can use it
to place spawn locations, weapons, scenery, and so on. There's a
lot to load (everything that could possibly be used in a
multiplayer game) so this can take a while. Once everything is
loaded, you'll want to arrange the windows so they're easily
accessible by you. For purposes of placing spawn points, the
Hierarchy view, the Game Window, and the Properties Palette are the
most important.
3.
When your map first loads,
the Game Window may appear blank or as one solid color. This is due
to the fact that the camera is located somewhere beneath the floor
of your environment.
To move the camera, hold down the middle mouse button and press
W, S, A, and D to move forward, backward,
left (strafe), and right (strafe), respectively.
Hold down the middle mouse button and press R and F to move the camera up and
down.
Hold down the middle mouse button and turn the mouse to look in any
direction. When your map first loads, hold down the middle mouse
button and press R to
raise up the camera. Your floor and walls should pop into
view.
To
speed up the camera, hold down SHIFT while moving the
camera.
4.
Once the floor of your map is
in view in the Game Window, take a minute to look around. You'll
notice the gray metal texture on the floor (remember f_il
light_scratchy_grey?). You should see a sky around you—by default,
this is the one from Coagulation, although you can change this by
editing your scenario file in Halo 2 Guerilla.
5.
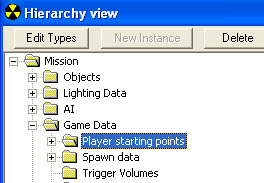
Go to
Hierarchy
view, click the + symbol next to the Scenario folder to expand it, and
then click the + symbol
next to Game
Data to expand that, as
well.
6.
In the Game Data list,
click
Player Starting Points.

Player starting points
selected.
7.
In the Game Window,
right-click to place a spawn
location.
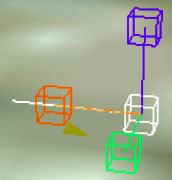
You will see a spawn point gizmo appear. Also, in Hierarchy view
notice that a new item has appeared under the Element heading. This
is the unique identifier for your spawn point. You can click it at
any time to select the spawn point.

Spawn
point.
8.
You've got your first spawn
location, but it may not be on the ground or in the exact location
that you want it. This is where the Properties Palette comes
in.
Make sure the spawn point is still selected, and then switch to
the Properties Palette.
You will see an item labeled Position.
9.
For now, don’t worry about
the X and Y values, but change the
Z value to 0.
This will ensure the player starts out on the ground.
To place weapons and other
objects
1.
In Hierarchy
view, browse to the
Netgame Equipment
folder.
2.
Just like when placing a spawn point, right-click in the
Game Window to display
a handle. It doesn’t look like anything yet, so you need to tell it
what kind of weapon to spawn.
3.
Near the bottom of the screen, find the item/vehicle
collection box, and then click the Browse button to its right.
The File Selection dialog box appears.
4.
Browse to the Halo
2 Tools installation folder and then to tags\multiplayer\single_weapons,
select the weapon you want, and then click Open.
5.
Continue placing weapons as described above, as well as
ammo, powerups, and vehicles found in their appropriate folders
located in tags\multiplayer.
When you are finished placing your spawn points
and objects, save your scenario. Now you’re ready either to edit
and create environment tags using Halo 2 Guerilla or launching the
environment in-game.